


Ancestral Flavors: Crafting Corn Tortillas From Scratch
- Hilary Elmer
- Sep 19
- 7 min read

Updated: Sep 26
Corn is an agricultural paradox. Most corn today is a genetically modified, chemical laden commodity crop, while historically corn was the staple of wholesome native central American diets. How did we get here? Is it possible to go back to the nutritious roots of corn?
(Skip to the delicious gluten free home made tortilla recipe here.)

Corn is grown at a mega industrial scale. In 1998 Monsanto created "round up ready" corn which was genetically modified with DNA from salmonella bacteria to survive being sprayed with the herbicide Round Up (glyphosate) so that fields could be sprayed to kill weeds without killing the crop. The consequence is that pesticides are routinely sprayed on corn fields, poisoning our farmers, our food and our ecosystems, in addition to the problems inherent in consuming genetically modified food.
As of 2024, over 90% of corn grown in America is genetically engineered for glyphosate tolerance. This GMO corn is found in many processed foods that you probably don't realize contain corn derivitives--and therefore, contain GMO's.
There are some foods where buying certified organic matters more than others. Corn is one where it matters a lot. Organic is always non-GMO. If corn is not certified organic, then it is genetically modified and sprayed with glyphosates. Organic corn is non-GMO and not sprayed with pesticides.
Before corn became agriculture's genetic mutant super star, Europeans that adopted corn at the time of Columbus didn't know how to prepare it properly. They just ground it into cornmeal and cooked it. Groups who came to rely on corn for a large part of their diet became susceptible to pellagra, which is niacin or vitamin B-3 deficiency. Pellagra means "rough skin" in Italian. In addition to rough skin, symptoms include diarrhea and mental confusion. If left untreated, pellagra can cause death.
The native central Americans who developed maize (what we call corn) from its wild ancestor teosinte ate corn for a large part of their diet without suffering from pellagra. This is because they learned to prepare it in a way that made the niacin that occurs naturally in corn, but is bio-unavailable, bio-available through a process called nixtamalization.
Nixtamalization involves boiling corn in an alkaline solution till the skin slips off. Traditionally the alkali came from wood ash which contributes extra minerals to the corn. In modern processing, they use lime or lye to treat the corn. This successfully nixtamalizes the corn, but without the added benefit of minerals from the wood ash. After boiling in the alkali, it is rinsed well.
The resulting food is called hominy. Hominy can be eaten as is or added to stew, but it is often ground up into a dough called masa or dried and ground into flour called masa harina. In addition to increased digestibility, nixtamalized corn has a different texture than corn that was simply boiled or ground into meal.
Masa or masa harina is what corn tortillas and tortilla chips are made from. (Sometimes the ingredients read "corn, lime" instead, but it's the same thing as masa.) If you have ever tried to make tortillas from cornmeal and found that they just crumbled apart, you will be delighted at the texture of masa harina dough. It is soft and pliable.
My family makes fresh corn tortillas when we want to have a special meal of pulled pork tacos. I have tried store bought corn tortillas, and I don't like them. They have added ingredients like cellulose gum, guar gum, enzymes, and preservatives. Not only do I avoid such chemical additives in my food, but I hate the flavor. Once you have tried fresh, home made tortillas, you just can't go back to the store bought stuff.
We typically make tortillas from purchased organic masa harina, but if you want to grow flint corn (Indian corn) and make it yourself, here is how:
Take one gallon of corn kernals, cover with water. Tie one quart of wood ash in cloth and boil with the corn till the skins slip off the kernal when rubbed between your fingers (please wear gloves as the lye water is caustic). Remove ashes and change to fresh water. Boil for an hour, pour off water, and repeat two more times for a total of three rinse washes. Cook until corn is soft, about 6 hours total. This yields hominy. The hominy can be eaten as is, added to stew, pounded into masa dough, or dried and ground into masa harina.
When we tried to make home made masa dough with corn that my son grew, we found that the finished tortillas were more crumbly than the ones we normally make from purchased masa harina. It was our first try. If you want to work at it and perfect the process, have fun! An application that would be great for home made masa is tamales. Tamales are that yummy Mexican food where spiced meat is stuffed inside of masa dough and wrapped in dried corn husks, then boiled. It's delicious, and slightly crumbly masa wouldn't affect it negatively.

Corn Tortillas Recipe
My son gets the credit for fine tuning this recipe so that we make good, pliable tortillas every time.
I am semi gluten intolerant, so I really appreciate that corn tortillas are nautrally gluten free.
This recipe can be scaled up to the number of tortillas you wish to make. One cup of flour yields about 6 tortillas that are around 5 inches in diameter. Start the dough at least a few hours before you want to eat. The dough needs time to rest and cool before baking.
Ingredients:
-1 cup organic masa harina
-1/4 tsp salt
-up to 1 cup boiling water (it will probably require less than this)

Equipment
-flat cast iron griddle, or another heavy bottomed pan
-tortilla press, or heavy pie dish**
-plastic baggie with sides torn so it opens like a book
-pancake flipper spatula
**If you are going to make tortillas very often, it's worth having a hinged tortilla press. You can find cast iron presses that are not very expensive. Otherwise, flatten the dough by pressing it with a heavy pie dish that has a smooth bottom.
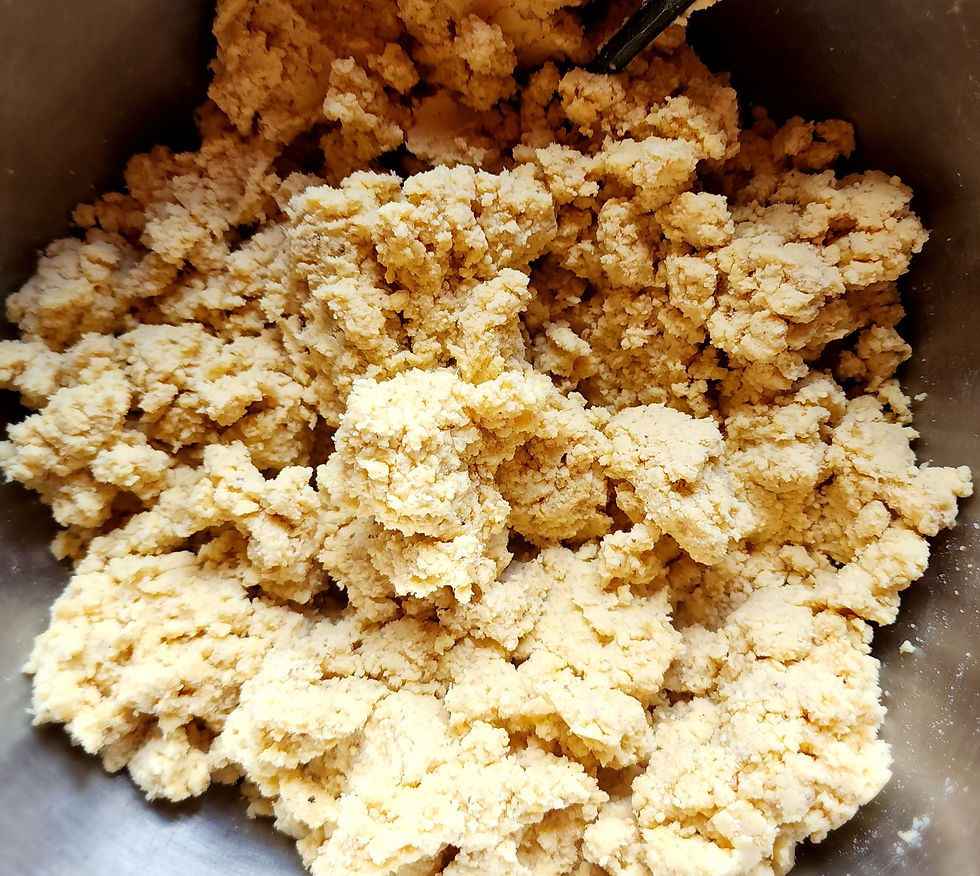
One of the keys to making good tortilla dough is to NOT GET IT TOO WET. This is very important. You avoid getting it too wet by adding a small amount of water at a time and stirring well with a fork before adding a little more water. If you add a lot of water at once, some of the flour gets saturated and it's almost impossible to mix it sufficiently with dry flour to get it back to the right texture.
-Mix the flour and salt in a medium sized bowl.
-Pour a little boiling water in to the masa harina flour. (It's ok if you took the water off the heat and it is not still actively boiling.) Mix it in thoroughly with a fork, then add a little more water, and repeat. Keep adding water and stirring but not until it all comes togther. Add less water than you think you should. If you reach the point where it no longer looks crumbly and there is no more dry flour in the bottom of the bowl, then you added too much water.
-Put the fork down and start squeezing it by hand. You will find that the seemingly crumbly dough comes together. Knead it a few times in the bowl by folding the dough in half, turn it ninety degrees, fold it again, and repeat until you have a nice, smooth mass of dough.


-Form golf ball sized balls of dough. You should get about 6 balls for every cup of flour. Roll them between your hands to form smooth balls. Set them back in the bowl or on a plate. You want them to dry off as the warm dough cools down, so do not cover them. Let it sit for a while before you begin cooking the tortillas.
-Before flattening dough balls, put your griddle on medium high heat so that it is hot by the time you are ready to start cooking. You will have to adjust the heat as you cook. I find that starting on medium high is good, but as I cook, I turn it down as needed to prevent them from burning.
-Place a ball of dough in the middle of one side of the opened up baggie, then fold the baggie over it so that the dough is enclosed, and press it flat inside of the baggie. A tortilla press makes this very easy. You apply a moderate amount of pressure with a press. When using a pie dish to flatten it, you need to put a lot of effort into it. Get it fairly thin, but not paper thin.

-You now have a flattened piece of dough inside of a baggie. Peel one side of the baggie open. Now peel the tortilla off of the baggie. If your dough got too wet, it will be mushy rather than peeling off nicely.
-To cook the tortilla, lay the flattened dough on the hot griddle. After it has been there a short time, turn it with the spatula.
My son says that the key to good tortillas is flipping them multiple times as they cook. This encourages them to form a hollow pocket from steam, like pita bread, and that is what makes tortillas that are pliable rather than that break when you wrap them around your taco filling.

-It might not start poofing until the second flip. When it poofs, press the air pocket with your spatula to encourage it to spread to the parts of the tortilla that are still flat. Continue to flip it a couple more times and press the air pocket, hopefully, to the edges of the tortilla. When you believe that it is completely cooked and that it will not poof any more, remove it and start baking the next one (yes, "baking" is the correct word for this).
I like to flatten the next tortilla while one is still baking. I bake two at a time because it goes faster.
Once you get the hang of it, it's fun and easy!

My favorite taco fillings are pulled pork (spiced with salt, cumin and paprika), salsa and avocado. What are your favorite taco fillings?


Comments